
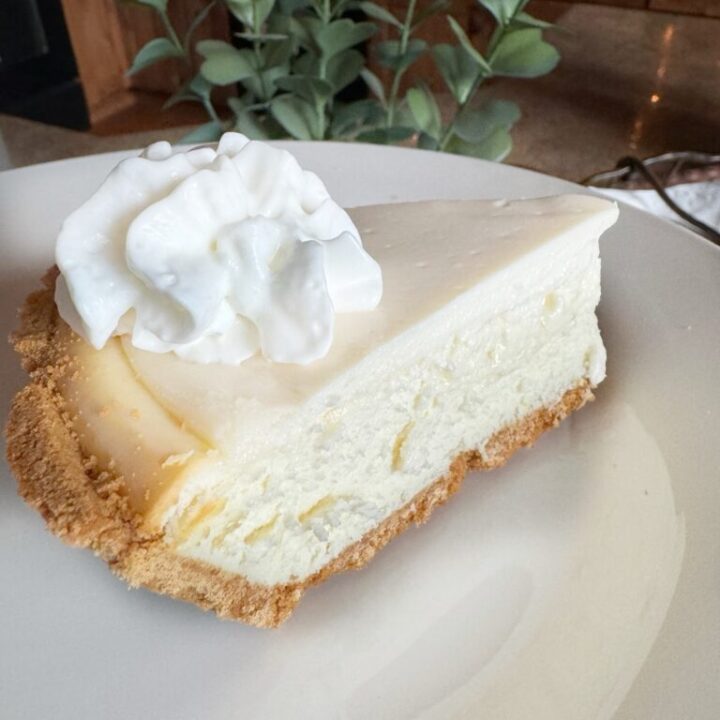
Mom’s Cheesecake
An Easy Delicious Cheesecake Recipe

Mom’s Cheesecake is a family favorite. This cheesecake is not too dense and not to fluffy making it the perfect texture.
Every bite is like eating a mouthful of buttery sweet cream. It is everything you are looking for in a cheesecake and more.
The steps are easy and the ingredients are accessible. This will be your new cheesecake recipe for life.
The Story Behind This Cake Is Unknown
We don’t exactly know the origins of this recipe or where EXACTLY my Mom got it, but she has been making it for years. I have to say that it is one of my very favorite cheesecakes I have ever eaten.
There is a full, printable recipe card at the end of this post. You will see in the card that I was a lot more descriptive then I usually am, as I was trying to articulate her process from observing her.
Like me, Mom doesn’t always cook and bake from exact measurements so we were measuring everything for you as well as timing it!
I will post a few pictures before the recipe card in case anyone needs more visual clarification.
You will also see a PRINT button under the picture on the recipe card. You can hit this button to have the recipe condense to one page that you are able to print or screenshot and save to your phone.
There will be NO ADS when you hit this print button. There is also a Pinterest button you can use to pin this recipe to your Pinterest page to save it.
If you would like to follow me on Pinterest, you can find me there as The Tipsy Housewife.


First Step, Merengue
You will see in the recipe card that you make a merengue for this cheesecake that you will eventually fold into the cream cheese mixture. Pictured above is how the merengue should look when it is done.
There is a description in the recipe card about lines staying in the merengue when it is correct and this picture above shows this. You will see that the “peaks” will be sort of shiny.
After you make the merengue you will want to set this aside to later incorporate into the cream cheese mixture.


The First Bake
You will add the mixture to the pie crusts and bake at either 350° or 325° until the center is set. Make sure you spread the filling evenly so it bakes evenly.
I explained this in the recipe card, but the first time you bake this pay attention to how it cooks. Every oven bakes differently so what may be a perfect time and temp for MY oven may be different for your oven.
I always recommend checking the actual temperature of your oven with an oven thermometer. I’ve written about oven temperatures before.
If you notice your cake getting too brown and the center isn’t set yet, reduce the temp.


Feel free to top your cheesecake with macerated fruit and make ahead whipped cream.
Mom's Cheesecake Recipe
Mom's Cheesecake is a family favorite. This cheesecake is not too dense and not to fluffy, making it the perfect texture. Every bite is like eating a mouthful of buttery sweet cream. It is everything you are looking for in a cheesecake and more. The steps are easy and the ingredients are accessible. This will be your new cheesecake recipe for life.
Ingredients
- *All ingredients and steps are pictured, linked and explained in the post above the recipe card
- Cheesecake Filling
- 2 Eight Inch Graham Cracker Crusts, Or you can make your own crusts *Mom uses the recipe on the back of the Graham Cracker Crumbs Package
- 4 Egg Whites (be careful not to get any yolks in)
- 1/4 teaspoon of Cream of Tartar
- 1 Cup of White Sugar
- 3 Eight ounce packages of cream cheese, softened
- 1 teaspoon of vanilla extract
- *additional flavor can be added like lemon extract if you prefer
- Sour Cream Topping
- 16 ounce container of sour cream
- 1 tablespoon of vanilla
- 3/4 cup of white sugar
Instructions
- Preheat your oven to 350°, if your oven runs hot, set your oven to 325°. **the bake time will vary depending on your ACTUAL oven temp, whether you are using a gas or electric oven, and even the darkness of your pans. It is highly suggested you know the actual temp of your oven by using an oven thermometer. It is also recommended that you keep an eye on this the first time you make it so that you know how it bakes up. We are using an electric oven for this recipe.
- Add your egg whites to a stand mixer. You must use a glass or stainless steel bowl for this recipe, a plastic bowl will alter the success of this recipe. We are using a kitchen aid stand mixer with the whisk attachment.
- Whisk on low until the egg whites begin to break down. You will see the white become slightly foamy. It is then that you add your 1/4 teaspoon of cream of tartar. Whisk again on medium/low for a minute or two.
- Measure out one cup of sugar and add gradually to the whites, add about 1/3 cup at a time. Whisk this in on medium each time until it is all incorporated.
- When the one cup of sugar is mixed in, turn on high, on our kitchen aid we did this at speed 8. Whisk at this speed for about 4 minutes, check the "peaks" of this egg white mixture (merengue) they should be stiff peaks. When it is right, the lines in this merengue will stay. You may have to run it on high a few more minutes. Right when you see the stiff peaks, stop, (pictured in post)
- Remove the merengue (egg white mixture) from the bowl. It does not have to be super clean to mix the next ingredients. Set the merengue aside.
- Add the 3 packages of cream cheese to the bowl and 1 teaspoon of vanilla. If you are going to add lemon extract or another flavor, this is when you should add it. Whip this all for about 3 minutes until it is smooth and creamy. You may have to scrape the sides occasionally.
- Now you will add in the merengue you made and set aside. Add about 1/3 of it at a time and have the mixer on low. You do not want the merengue to deflate. You are basically folding it in. You may occasionally have to scrape the sides and whisk attachment. Repeat this until all the merengue (egg white mixture is incorporated)
- Pour the mixture into the two graham cracker crusts. You will want to leave a little room on top of each one for the sour cream topping that you add later. Spread it out so it is even. Bake in the oven for ABOUT 30 minutes. Remember to keep an eye on this the first time until you know how your oven bakes this. You want the cake to be firm in the center, not too many cracks, if you see it cracking and the center is not firm yet, you will need to reduce the heat by 25°.
- While your base is baking, make the sour cream topping by mixing in a bowl by hand, the 16 ounce container of sour cream, a tablespoon of vanilla and 3/4 cup of sugar. Whisk/Mix this until the sugar is dissolved, place this all in the fridge until ready to top the cheesecake in the oven.
- When your cakes in the oven are set in the middle, and you may see slight cracks (pictured in post) pull the cakes from the oven and turn the oven up to 400°. Add the sour cream topping to both the cakes and smooth it evenly, almost to the edge but not all the way to the edge. Place in oven that is 400° and bake ten more minutes.
- The cakes should not be browned (although ours got the very slightest brown this time on one edge) but they should be set. Pull from oven and let cool for at least 30 minutes to an hour. Then the cakes should be covered and placed in the fridge to get cold for a minimum of 8 hours or best overnight.
- You can serve these cakes plain or with any topping you prefer.
**If you do not want to make two 8 inch cakes, you can make a 9 x 13 pan and then you would increase the cream cheese by 1 package, 1 EXTRA egg white and an additional 1/4 cup of sugar.
***this cheesecake also freezes well

Want another great cake idea? Try my special Strawberry Shortcake!